
This page avoids repeating information on this page. You should really read that page first.
Whew, still with me? Here's the fun part. Next we notice that if the B's and C's are around 5 feet long, their strut ratios are so close to each other that the length difference is nearly a measly 1/8 inch. If you take advantage of this lucky fact, you can just plan to let that extra 3/4" outside the hole on each end of the strut be 3/4" plus 1/16" on each end - this will work fine, in fact the variations in that end bit will be more than 1/16" anyway. This means you will cut the B's and C's the same length, and only differentiate between them later. Now from playing with different permutatations of sums of pairs of strut ratios, you can get the following cutting plan which i believe is optimal:
| Struts to cut from each 10-foot conduit | Quantity of 10-foot conduits | Comment |
| C + D | 62 | cut C's as if they were B's |
| B + D | 10 | actually the same as previous cut |
| B + B + waste | 11 | |
| A + E + waste | 32 | |
| F + F + waste | 16 |
| Strut letter |
Color code on assembly diagram |
Quantity (including 2 spares) |
Strut ratio (ratio of hole-to-hole-length to dome radius) |
Hole-to-Hole length |
Pipe cut length (hole-to-hole-length plus 2 times 3/4" excess) |
| A | yellow | 32 | 0.25318 | 4.059' = 4' 0" 11/16 | 4.184' = 4' 2" 3/16 |
| B | red | 32 | 0.29524 | 4.734' = 4' 8" 13/16 | 4.859' = 4' 10" 5/16 |
| C | blue | 62 | 0.29453 | 4.722' = 4' 8" 11/16 | 4.847' = 4' 10" 3/16 |
| D | green | 72 | 0.31287 | 5.016' = 5' 0" 3/16 | 5.141' = 5' 1" 11/16 |
| E | purple | 32 | 0.32492 | 5.210' = 5' 2" 8/16 | 5.335' = 5' 4" 0/16 |
| F | orange | 32 | 0.29859 | 4.787' = 4' 9" 7/16 | 4.912' = 4' 10" 15/16 |
One practical tip i figured out after many difficult cuts: open up the pipe cutter and put a drop of oil on each of the three pins that the three rotating thingies (2 rollers and a blade) rotate on. It really makes cutting about 5 times easier.
Dome radius is 16.033 feet. Declination (from top) of apex is 66 degrees, i.e. 16.033 times cos(66) = 6.521' = 6' 6" 4/16.
| Strut | Strut ratio (ratio of hole-to-hole-length to dome radius) |
Hole-to-Hole length |
Pipe cut length (hole-to-hole-length plus 2 times 3/4" excess) |
| Top C | 0.1914 | 3.069' = 3' 0" 13/16 | 3.194' = 3' 2" 5/16 |
| Top D | 0.2012 | 3.226' = 3' 2" 11/16 | 3.351' = 3' 4" 3/16 |
| Middle C | 0.3301 | 5.292' = 5' 3" 8/16 | 5.417' = 5' 5" 0/16 |
| Middle E | 0.3458 | 5.544' = 5' 6" 8/16 | 5.669' = 5' 8" 0/16 |
| Bottom D | 0.4381 | 7.024' = 7' 0" 5/16 | 7.149' = 7' 1" 13/16 |
| Bottom E | 0.4463 | 7.156' = 7' 1" 14/16 | 7.281' = 7' 3" 6/16 |
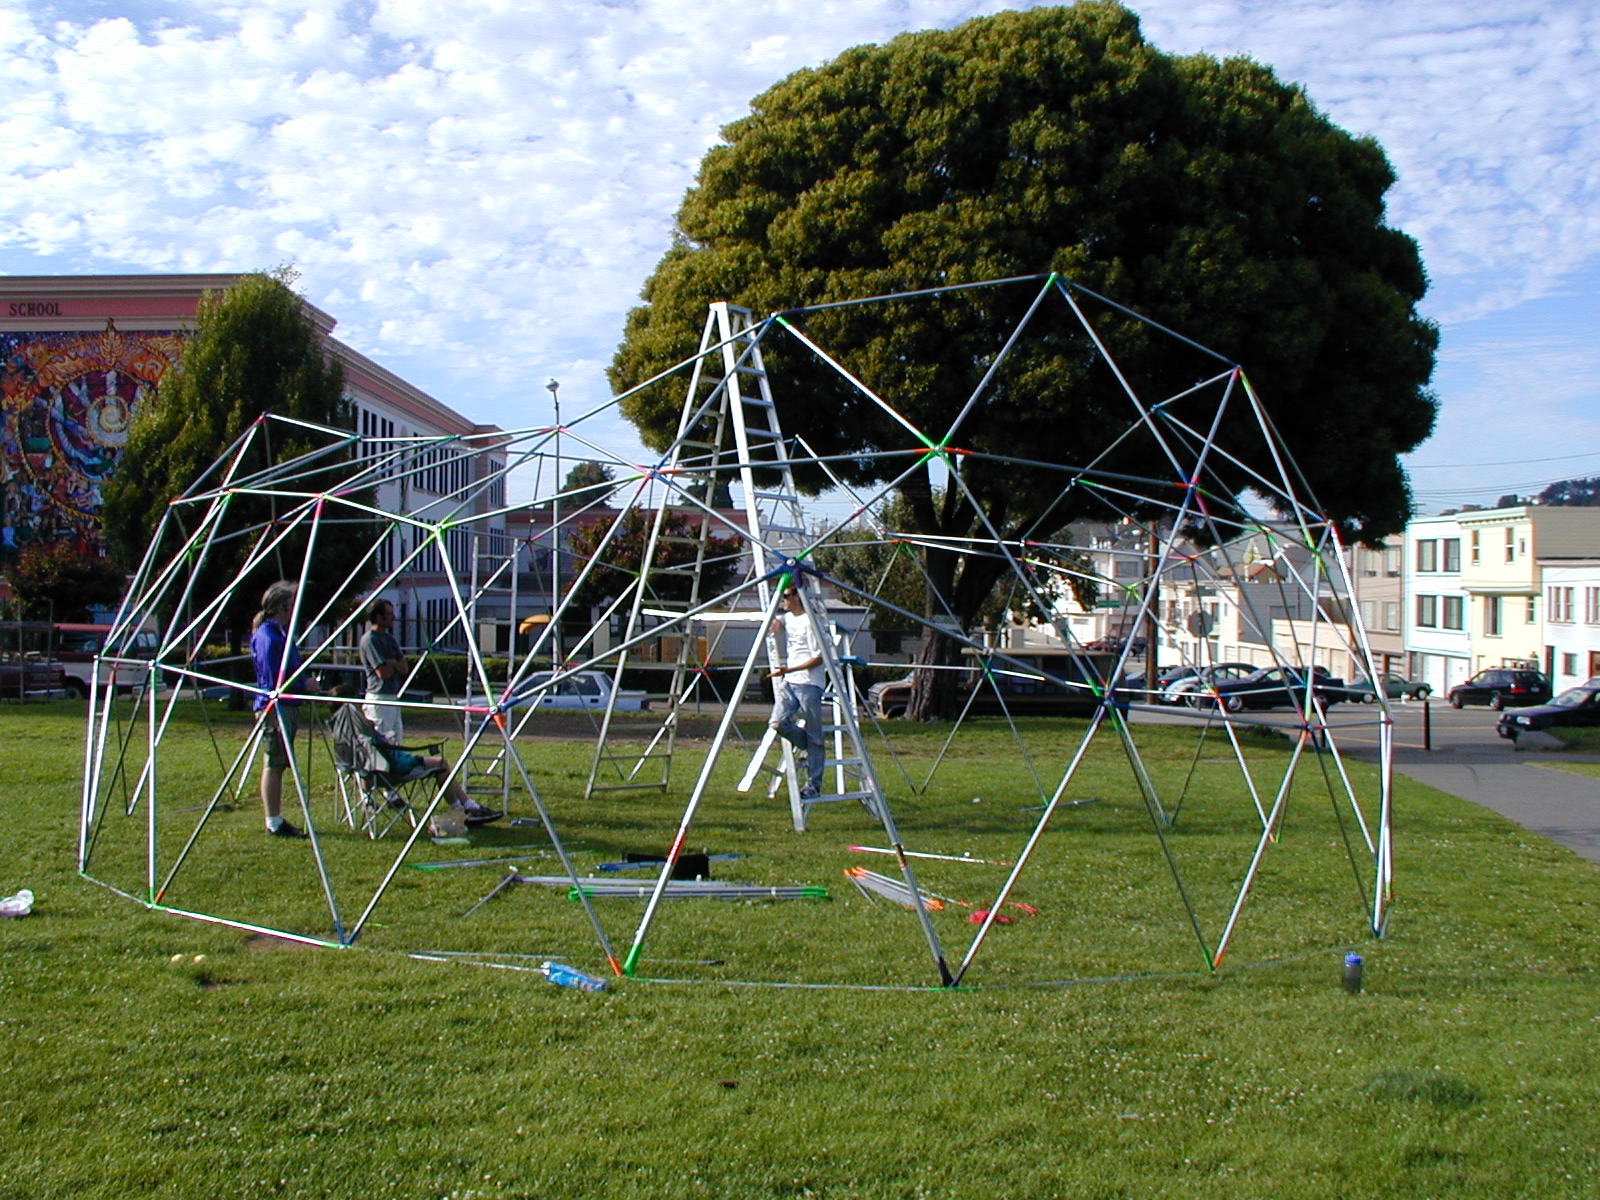
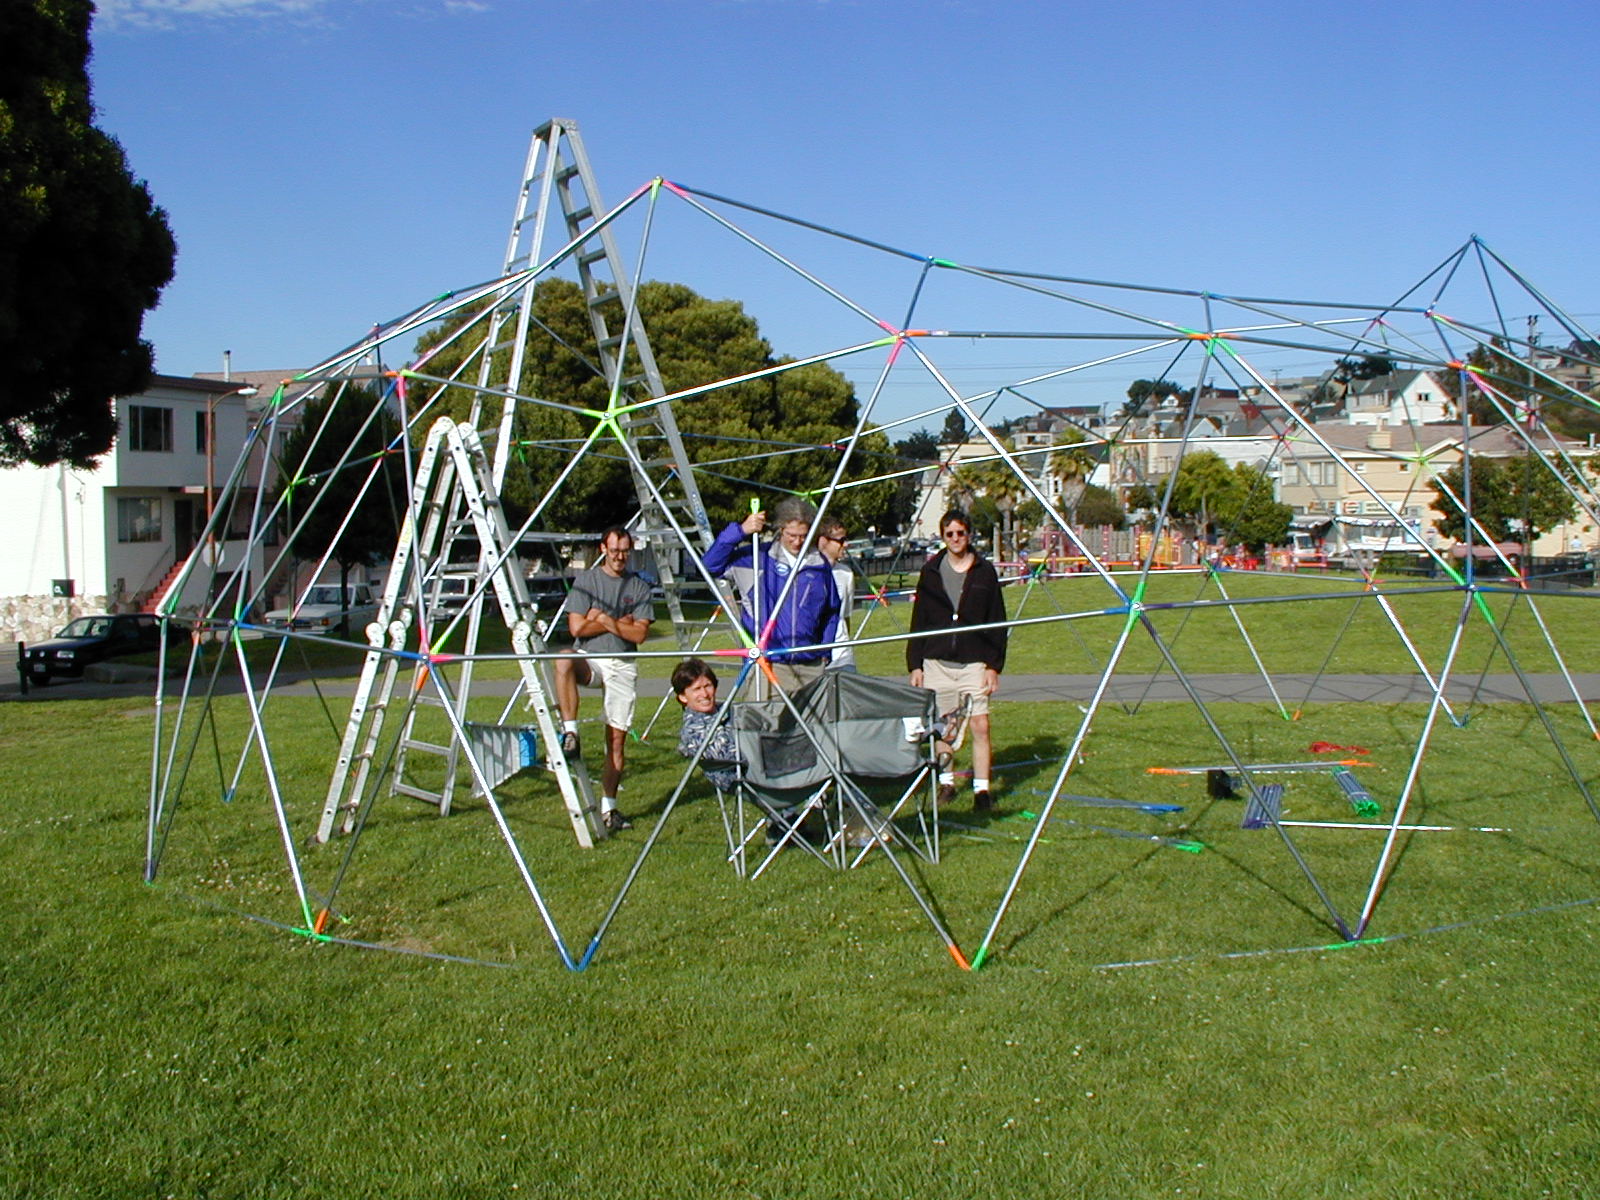
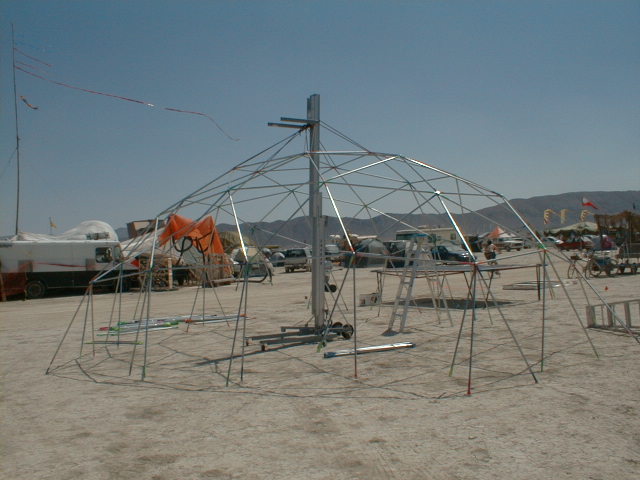
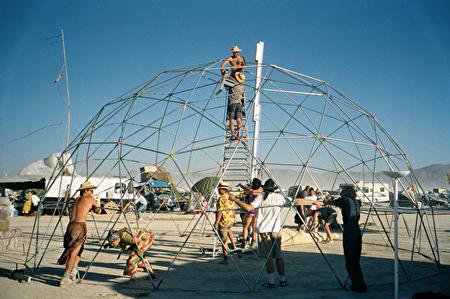
Here are some photos of the extent of the assembly. Click to enlarge.
This made perfect sense to me, but how would i make a temporary mast for this dome? After hours of online research, i found a solution. There is a materials lift, the Genie SLC-18, which is perfect for the task, and readily available for rental at many equipment rental shops. (An older model, the SL-18, is essentially the same.) It lifts up to 650 pounds to a height of 18 feet. (I weighed the dome struts and calculated that with hardware the weight should be under 600 pounds.)
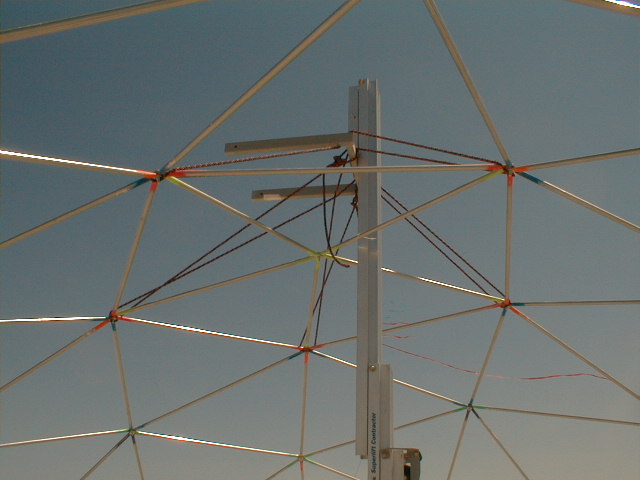
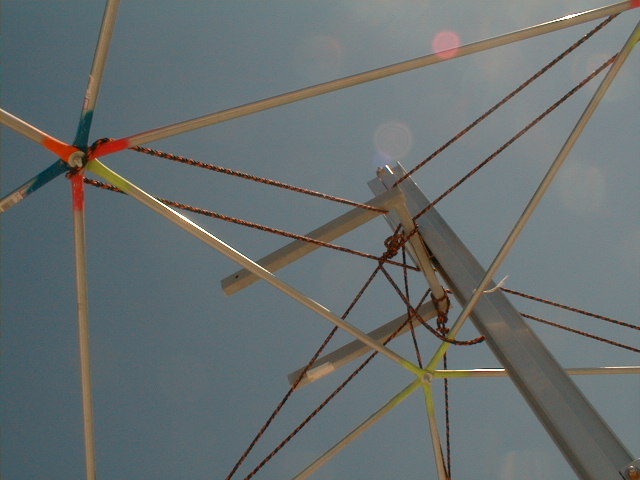
To get started, you set up the lift in the center of where the dome should be. You construct the top pentagon, with all the extra struts hanging down from it (in other words, a total of 25 struts) around the mast of the lift, so that the mast is going up through one of the triangles of that top pentagon. Then, with one continuous piece of rope (rated to well over one-tenth of the total dome weight; i used 400-pound "truck" rope) you rig the five outer vertices of the top pentagon to the lift, hanging under the fork. The top vertex should be centered very well on the lift in the left-right direction, and as close as possible to the mast in the in-out direction while leaving a little room for the dome to sway (say, 3 inches clearance). The top vertex should be as high as possible, since it will eventually be 16 feet high but the fork only goes up to 18 feet high (well, not even quite that high) --- and keep in mind that your rope will stretch more after more load is placed on it. Using one continuous piece of rope allows you to easily adjust the assembled struts to be as close to level as possible, and also allows the load to be perfectly distributed between the five vertices, which is highly desirable. Do take the time to make sure the height, centering, and leveling are as good as you can get them before going on since its difficult or impossible to fix this later. The photos below (taken after more than just the initial 25 struts were assembled) show how the rigging should look. It's worth mentioning that Genie makes a boom attachment which would be better than the standard fork attachment, but it seems most rental places don't have it. If you use the fork just make sure your rigging is tied to the back part of the fork --- not the sides, from which it could slip off.
One pitfall we ran into the first time we did this was that one of the verteces above the layer being worked on went concave (popped in) while the dome was partially assembled. To fix that, one person lashed a rope around the troublesome vertex, and pulled it out (while everyone else tugged the dome in the other direction) and held it out while the layer below was assembled. After that layer was assembled, the structure was stable at the previously-concave vertex.
Another slight problem was that the rigging was tied slightly too low --- maybe 4 inches too low for the maximum lift height. When we got to the bottom layer, one person had to lift up a little on one spot on the dome while others placed the very bottom struts in their vertices. This was not too bad, but it would have been better to have tied it up to the right height in the first place.
After the last nut is tightened (hooray), get out your 16-foot stepladder (uh, you have one, right?), untie the rigging rope, and carefully detach the fork so that you can shimmy it through a top triangle and bring it down the ladder. (See photo below.) Then lower the lift and take it out through the entrance. All done.
It's worth it to use the lift at disassembly time too. You do the assembly procedure backwards --- crank up the lift mast all the way, shimmy the fork through a top triangle and attach it to the mast, tie up the rigging rope as before, and then start unbolting verteces one layer at a time, lowering the lift after each layer. You can take off each layer very quickly (we even had two wrenches going). Compare this to disassembling bottom down, for which you would have to keep moving the ladder (or scaffolding) around, and struts would be dropping from high up.
It was attached to the frame at one out of every (maybe) 8 vertices, where the attached vertices were evenly spaced over the surface. The attachment method required a large washer (or other round object) and two zip-ties (AKA cable ties) --- a handful of fabric was bunched up near the vertex, a washer was tossed into the bunch from the exterior, a zip-tie was used to trap the washer inside, then the washer (now trapped inside the fabric) was zip-tied to the frame's vertex. This is not a great picture but might give you some idea.

| Item and quantity | Cost (incl. tax and/or shipping) |
| 3/4 inch EMT conduit 10-foot lengths, quantity 132 | $322.18 |
| 1 inch EMT conduit 10-foot lengths, quantity 2 | $8.10 |
| 1-1/4 inch EMT conduit 10-foot lengths, quantity 2 | $10.74 |
| Pipe cutter | $9.69 |
| Screw anchors, quantity 10 | $42.12 |
| Hardware (bolts, washers, nuts) | ??? |
| Titanium drill bit | $15 |
| Spray paint for color-coding pieces | $22.83 |
| Strapping tape for bundling pieces | $9.05 |
| Grand total | $439.71 + ??? |